



Planting and Growing burro's tail

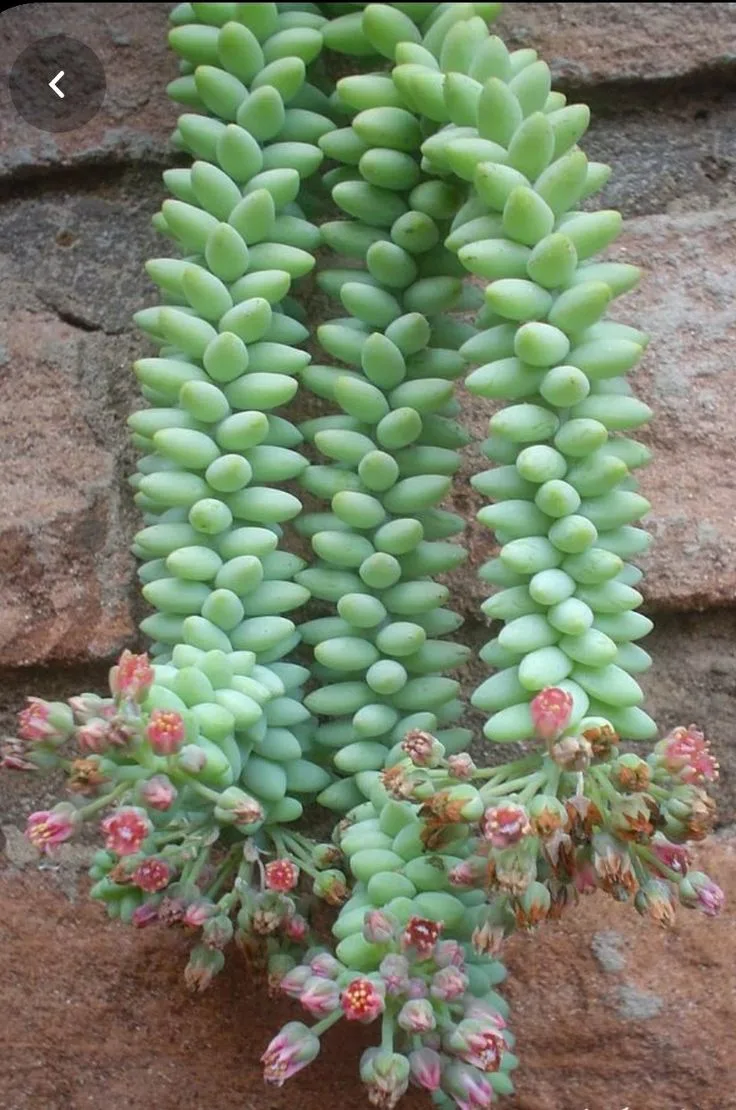
| Care difficulty | 3 / 5 |
|---|---|
| Watering schedule | Let gritty soil dry fully before each thorough watering cycle |
| Sunlight requirements | Full sun |
| Ideal temperature | 15 – 25 °C |
| Soil type | Loam · Sand |
| Soil pH | Acid · Alkaline · Neutral |
| Soil moisture | Well drained |
| Fertilizing | Very dilute low-nitrogen succulent feed monthly in warm growth |
| Toxicity | Information to be completed |
How to Water burro's tail?
Burro's tail thrives in environments that mimic its native arid conditions, requiring minimal water to sustain its succulent leaves. It exhibits a high drought tolerance and prefers infrequent watering, ideally once every three weeks. As an evergreen plant often grown indoors due to its sensitivity to cold, burro's tail benefits from the stable temperatures and controlled watering of a home environment. In indoor settings, careful attention to soil moisture will prevent root rot and maintain the health of burro's tail, ensuring it continues to add a touch of verdant charm year-round.
Learn more →What Are the Sunlight Requirements for burro's tail?
Burro's tail thrives in full sun conditions, where it receives direct sunlight for several hours each day. The intensity of light should be robust, as it greatly encourages healthy growth and foliage coloration. Burro's tail is also tolerant of partial sun, adapting by potentially exhibiting less vibrant foliage. Deviations from its light preferences might result in leggy growth and pale leaves, indicative of suboptimal conditions. When grown outdoors, burro's tail should be placed in locations with plenty of light exposure, while indoors, a south or west-facing window is ideal, ensuring it receives ample sunlight. Its fleshy leaves and trailing stems are designed to maximize light absorption, making it well-suited for sunny environments.
Learn more →What Is the Ideal Temperature Range for burro's tail?

Burro's tail is moderately resilient to temperature variations, tolerating ranges from 0℃ (32℉) to 43℃ (109℉). This adaptability makes it suitable for various environments, though extreme conditions require special care. In overly cold situations, burro's tail may exhibit leaf drop or wilting, whereas overheating can cause yellowing or shriveling. To protect burro's tail, bring it indoors during severe cold, and ensure adequate shading and hydration during extreme heat. Regular adjustments based on seasonal changes are key to maintaining its health and longevity.
Learn more →What Soil Is Best for burro's tail?
Burro's tail thrives in well-draining soil to prevent root rot. A suitable soil mix can be store-bought succulent & cactus soil or homemade with equal parts potting soil, coarse sand, and perlite or pumice for aeration. Enhance growth with a succulent fertilizer during the growing season, applied according to package instructions. Always ensure pots have drainage holes.
- Soil type
- Loam · Sand
- Soil pH
- Acid · Alkaline · Neutral
What Are the Moisture Requirements for burro's tail?
Well drained
Learn more →How to Fertilize burro's tail?

Fertilize burro's tail with a balanced succulent fertilizer, optimally during the growing season (spring and summer), monthly at quarter strength. Fertilization supports robust growth and potential flowering. Avoid over-fertilization, which can damage roots and foliage. In dormant periods (fall and winter), reduce feeding to prevent nutrient overload. Utilize well-diluted solutions to safeguard against burning delicate tissues. Measure accurately for efficacy and plant safety.
Learn more →How to Prune burro's tail?

In order to keep a beautiful shape, large succulent plants may need pruning. For example, for echeveria planted in the garden, redundant branches or branches that are too dense need to be cut off in spring and fall. This depends on the plant's purpose and your preference. Tools for pruning mainly include knives, scissors, and some medicines (such as sulfur powder). In order to propagate new plants, cut some leaves in spring and fall. Select a stout stem with 5-6 leaves. Cut it off with a knife, then smear the wound with sulfur powder, and plant it after the wound is healed. Slightly wet the soil used for planting.
Learn more →How to Propagate burro's tail?

Burro's tail is a succulent well suited for propagation through cuttings, which makes expanding your collection or sharing with friends straightforward. Obtain a healthy cutting by gently removing a leaf or cutting a stem section. Allow the cut surface to callous for several days to prevent rotting when planted. Once calloused, nestle the cutting in well-draining, sandy soil specifically designed for succulents. Ensure consistent but moderate watering, maintaining soil moisture without waterlogging. With proper care, roots will establish, and new growth will emerge, heralding successful propagation.
Learn more →How to Transplant burro's tail?
The optimal time for transplanting burro's tail is during the pleasant window of late spring to early summer, when the warmth stimulates vigorous growth. A well-draining location with ample sunlight is crucial for success. For best results, be gentle with the delicate trailing stems when handling.
Learn more →How to Care for burro's tail in Winter?

Burro's tail, a native of the balmy and arid climates of Southern Mexico, is well-adapted to milder winters, with its succulent leaves storing water to survive dry seasons. As the mercury drops in colder winters, burro's tail enters a period of dormancy, lowering its water and light requirements. Winters are a test of a gardener's attentiveness, as burro's tail requires a cool, brightly lit area, minimal watering, and protection from freezing temperatures.
Learn more →How to Plant burro's tail?
Indoors-potted: Ensure burro's tail is placed where it can cascade freely, mimicking its natural hanging habit; rotate the pot for even growth. Outdoors-potted: Burro's tail's trailing stems thrive outside but require shelter from extreme weather to maintain their delicate leaves. Outdoors-in the ground: Burro's tail should be planted in a spot that allows its sprawling nature to accentuate rockeries or slopes, avoiding damp, shaded areas.
Learn more →How to Repot burro's tail?
Repot burro's tail in spring when growth is active, every 2 years to accommodate its trailing habit. Choose a shallow, wide pot to support its cascading stems and ensure root comfort. Post-repotting, provide bright, indirect light and avoid watering for a week to prevent root rot and encourage rapid recovery. This unique succulent thrives with careful handling due to its fragile leaves.
Learn more →Common Pests & Diseases

Pests
May be attacked by aphids, mealybugs, scale insects and vine weevil
Explore the plant health library →Troubleshooting
Mushy Translucent Leaves, Leaf Drop, or Basal Stem Rot
burro's tail (Sedum morganianum) stores water in fleshy leaves and rots rapidly when kept wet in dense soil or cool weather. Handle gently to avoid knocking off fragile plump leaves or rubbing off the protective powdery epicuticular wax (farina).
| What you notice | Possible explanation | What to check next |
|---|---|---|
| Lower leaves turn translucent, yellow, and mushy, or drop at a light touch while soil is damp | Overwatering, poorly drained potting mix, or water trapped in leaf rosettes | Check whether the potting mix stays wet and inspect the stem base for blackening |
| Leaves look wrinkled, deflated, and thin while the gritty mix is completely dry | Underwatering during warm active growth | Feel deep into the pot and lift it to confirm total dryness |
| A few oldest bottom leaves dry into papery husks while upper growth stays firm | Normal lower leaf reabsorption as stems mature | Confirm upper leaves and stem are firm and unblemished |
- Pot in a sharply drained mineral-rich succulent mix (cactus compost amended with coarse grit, perlite, or pumice) in a pot with drainage holes.
- Water thoroughly only after the entire potting mix has dried out completely, and keep much drier during cool winter rest.
- Water at the soil line rather than pouring water into leaf rosettes or onto fuzzy foliage.
- If basal rot occurs, cut above the blackened stem with a sterile blade, let the cutting callus for several days, and root in dry-to-barely-damp gritty mix.
Stop watering immediately if the stem base turns black and soft; decayed roots cannot recover.
Handle fragile leaves by the pot rim rather than the stems to avoid accidental leaf loss.
Stretched Etiolated Growth, Faded Color, or Mealybugs
Insufficient direct sunlight causes stems to stretch and lose compact form or red leaf margins, while mealybugs hide in tight leaf axils.
| What you notice | Possible explanation | What to check next |
|---|---|---|
| Wide gaps between leaves, pale green color, and leaning or floppy stems | Insufficient bright light (etiolation) | Assess daily hours of direct sun or bright windowsill light |
| White cottony tufts in leaf axils or sticky residue on stems | Mealybug or scale infestation | Inspect tight leaf bases, stem junctions, and pot rims closely |
- Move gradually into brighter light (such as a sunny south- or west-facing windowsill) so leaves regain compact growth and natural red-tinted margins without sudden sunburn.
- Prune stretched stems in spring, allow cut ends to callus for a few days, and root cuttings in gritty succulent mix.
- Isolate pest-infested plants and dab visible mealybugs with a cotton swab dipped in rubbing alcohol.
Acclimate shade-grown succulents to intense summer sun gradually over one to two weeks to prevent bleached sunburn scars.